Decking help

screws much better, also screws should be stainless steel so it is compatible with the pt wood.... depending on the screw locations and size of deck boards may need to predrill. if you are using screws then you can get a collated screw gun to make it easier or just use a regular screw gun if your deck is not to big.
terminator3 said:
screws much better, also screws should be stainless steel so it is compatible with the pt wood.... depending on the screw locations and size of deck boards may need to predrill. if you are using screws then you can get a collated screw gun to make it easier or just use a regular screw gun if your deck is not to big.
Hey thanks. Are stainless screws better than galvanized? The deck boards will most likely be 14' long, by 5/4" thick, by 6" width. I was thinking of getting either an impact driver, OR the collated screw gun. I don't own any tools that would properly do the job. Would I need a pilot hole for this? thanks!

stainless are better than galvanized, but you should predrill. If you go this route get yourself a good combo cordless screwgun kit, so you can predrill with the drill and drive the screws with the impact gun. The collated gun is great, but overkill for this because what will you use it for later?

FilmCarp said:
stainless are better than galvanized, but you should predrill. If you go this route get yourself a good combo cordless screwgun kit, so you can predrill with the drill and drive the screws with the impact gun. The collated gun is great, but overkill for this because what will you use it for later?
Thank you! Good advice. Couple stupid questions for you. If i pre-drill, is that through the decking board, AND into the joist? or just through the decking board. And would you have a suggestion as to what type of combo screw gun you mentioned? Thanks again

if the budget supports it consider decking such as Azek which uses a concealed clip so the screw heads are not visible. The boards are also composite so they are immune to rot, twisting, and splintering. Having no screw or nail heads visible not only looks good, but it is also better when it comes time to shovel snow. If you go from r the Azek I'd say avoid the darker colors as it can get hot for bare feet.
As far as a cordless kit, get an 18v lithium ion set with a drill and impact driver. Again If budget permits get the drill to have hammer function which will come in handy if you drill in concrete. I'm partial to Makita, Dewalt, or Milwaukee, but depending on how often you use it Ridgid or even Ryobi would prbly be fine
if you predrill you should use a tapered countersink bit that will go through both boards. Buy a couple of spares. I second Makita or DeWalt. If this is the only project you ever plan to tackle then Ryobi is okay.
FilmCarp said:
if you predrill you should use a tapered countersink bit that will go through both boards. Buy a couple of spares. I second Makita or DeWalt. If this is the only project you ever plan to tackle then Ryobi is okay.
thanks for that tip too. Compared with my original plan of using a collated screw gun, this is a two step process—first pre-drilling, then screwing, using two different tools. If all things are equal, am i better off using the collated screw gun? Just wondering how much faster it would actually be?
thanks
Per your size of deck the collated screw gun does not save that much time and it does not predrill holes for you. You can also get self drilling screws with self setting heads which may work fine without predrilling. A 5/4" x 6" deck board as long as you are not too close to the edge should not require predrilling especially for PT pine which is softer wood....you should make sure the wood is kiln dried...even if it is stampled kiln dry it may be quite "wet" a dry board will be much lighter than a wet board.
terminator3 said:
Per your size of deck the collated screw gun does not save that much time and it does not predrill holes for you. You can also get self drilling screws with self setting heads which may work fine without predrilling. A 5/4" x 6" deck board as long as you are not too close to the edge should not require predrilling especially for PT pine which is softer wood....you should make sure the wood is kiln dried...even if it is stampled kiln dry it may be quite "wet" a dry board will be much lighter than a wet board.
thanks, I was going to try to get kiln dried wood. Was going to get it from Jaegar Lumber, unless there is a better suggestion. As for pre-drilling or not, seems to be many differing opinions on this, but that's expected  this is all great information, thanks!
The only reason I suggested predrilling was because of the stainless steel screws, which are more prone to cam out. The collated gun really isn't worth it for this job.

FilmCarp said:
The only reason I suggested predrilling was because of the stainless steel screws, which are more prone to cam out. The collated gun really isn't worth it for this job.
Thanks for that insight. I have a lot to think about now, the latest being where to actually buy the lumber, that is hopefully "dried". If anyone has ideas on this, of course I'd love to have those too. Thanks
you can try boards and beams in Fairfield there you can get all sorts of exotic hardwood decking. If you can afford ipe then it's the longest lasting deck of all, of course it would cost 6x the price, but there are other hardwoods that are only 3x the price. For the hardwoods, definitely need to predrill or you will split the wood
The collated screw gun would be a waste for you. Also I would skip pre drilling. There are alternatives to stainless that are designed for this purpose and have heads that will not split the boards.

I have done a lot of this. Would recommend 2.5" "Star[head] self-driving "Deckmate" coated screw". Available at HD and they come with a star-shaped driver head in each box. They are made specifically for such use.
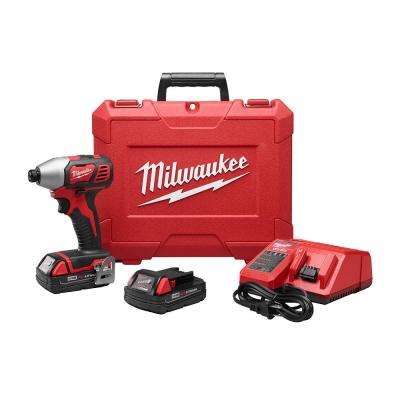
Also, if you pop for an Milwaukee Cordless Impact Driver (seen here, which you can also use as a drill if you wish) you can drive the screws very quickly without pre-drilling (although I will sometimes pre-drill at the ends of the boards) including sinking the heads flush. The impact driver has incredible torque and I have put unbelievable milage on mine for years for all manner of work. Very rugged.
Also, when "Red Barchetta" (above) sez "If budget allows for Azek" he's not kidding. It's supposed to last forever but it is incredibly expensive.
Also, don't set the boards super tight to each other. You need to allow for a wee bit of water pass through between the boards and expansion/contraction.
Another tip: If you choose to use pressurized treated lumber, -even if you think the long lengths are straight you may find when you go to lay them down that they may have a slight bow in them. -For that, -get/use a flat bar. With a flat bar, after you have screwed down one end of the board, move down to where the bow starts, put the short end of the flat bar between the boards and twist. -Doing that, you can force the board over while you shoot the rest of the screws. Good luck.

With PT pine boards, they are soft enough that pre drilling isn't needed. I agree with "steel" that the regular old deck screws from HD are fine for this project. Stainless are great when you are investing a couple of grand in exotic boards that will last 30+ years but not needed for this application.
One thing to consider is spacing between boards. Whatever gap you decide, it helps to use a piece of wood or some other jog to ensure that the same distance is between each board.
Also since you are using soft wood, test the driver/drill setting to ensure you don't end up driving the screws too far below the board facia. If its set too tight, a drill has the opportunity to set the screw halfway through a board.
We did this project last year and replaced the PT boards with Trex, 16x16 and it ran $3500. Once we pulled the decking, the surface of the joists was filled with holes, we ended up sistering new 2x6's to the frame so we had a clean edge to screw into. I doubt that is needed in your application, but trex uses clips with shorter and angled screws.
rowerg said:
With PT pine boards, they are soft enough that pre drilling isn't needed. I agree with "steel" that the regular old deck screws from HD are fine for this project. Stainless are great when you are investing a couple of grand in exotic boards that will last 30+ years but not needed for this application.
One thing to consider is spacing between boards. Whatever gap you decide, it helps to use a piece of wood or some other jog to ensure that the same distance is between each board.
Also since you are using soft wood, test the driver/drill setting to ensure you don't end up driving the screws too far below the board facia. If its set too tight, a drill has the opportunity to set the screw halfway through a board.
We did this project last year and replaced the PT boards with Trex, 16x16 and it ran $3500. Once we pulled the decking, the surface of the joists was filled with holes, we ended up sistering new 2x6's to the frame so we had a clean edge to screw into. I doubt that is needed in your application, but trex uses clips with shorter and angled screws.
Hey thanks!
I looked into Trex and others like it, and because of cost and esthetics have decided to keep to PT wood. Hopefully i won't have to pre-drill, since that seems to be double the work.
I was planning on using deck spacers, to space out the boards. Either 1/4" or 1/8" between each one. Guess it really depends on how "wet" the boards are, and hard to find out, so curious what you all think is best.
I'm pretty sure the frame and joists under the current decking is in good shape, although I really won't know until i start pulling the boards off...I'm curious how long the project took you? Taking off the old boards? And laying the new ones down. I was planning on easily an entire weekend, but probably longer. It's just myself and my wife doing this, hope we're not taking on too much.
Thanks
I have no experience with this DIY job, but have one concern that has not been addressed so far. If you have kids that might possibly go barefoot, the pressure treated pine lumber could be prone to splinters, some maybe large. What have other people experienced with this installation?
there are a bajillion decks done with PT 5/4 decking. Splinters usually are not a big deal.
I personally wouldn''t put a 1/4" between boards, -that may be a bit much visually, especially if you put down wet boards which will shrink a bit.
Have an arsenal of crow bars and flat bars with a heavy hammer for the demo and nail pulling. There is also a kind of small crow bar called a "Cat's paw" that can be useful for digging out those sunk-in problem nails when used with a hammer. I would count on at least a weekend but maybe you have more energy than me.
If you do find that the tops of some of the joists are rotted soft, you can do as "rowerg" is suggesting and sister them in problem places. You might want to check a couple of likely suspects before you do your lumber shopping to see if you will also need some new joist lengths for that purpose.
Do a rough count as to how many screws you will need. They are cheaper if you buy a bigger box and you don't want to run out in the middle of your work.
Don't demo all at once. If you demo as you replace, you'll always have a nice platform to work from and can keep your miter saw near your work.
If your deck is too big to lay down full board lengths, try to stagger the cuts. It looks better if you don't line up cuts on adjacent lengths.
I had no idea that I had so much to say about this! Let us all know how it goes.
I will add one more tidbit. If you pull up boards and the joists are okay but worn, consider treating the top of the joist with a preservative as you go. Just keep a bucket and an old brush nearby. Pull up a few boards, clean and coat the joists, and install a few boards. I'd also plan maybe two weekends. If you finish early, great, but why feel under the gun if you don't have to.
steel said:
I personally wouldn''t put a 1/4" between boards, -that may be a bit much visually, especially if you put down wet boards which will shrink a bit.
Have an arsenal of crow bars and flat bars with a heavy hammer for the demo and nail pulling. There is also a kind of small crow bar called a "Cat's paw" that can be useful for digging out those sunk-in problem nails when used with a hammer. I would count on at least a weekend but maybe you have more energy than me.
If you do find that the tops of some of the joists are rotted soft, you can do as "rowerg" is suggesting and sister them in problem places. You might want to check a couple of likely suspects before you do your lumber shopping to see if you will also need some new joist lengths for that purpose.
Do a rough count as to how many screws you will need. They are cheaper if you buy a bigger box and you don't want to run out in the middle of your work.
Don't demo all at once. If you demo as you replace, you'll always have a nice platform to work from and can keep your miter saw near your work.
If your deck is too big to lay down full board lengths, try to stagger the cuts. It looks better if you don't line up cuts on adjacent lengths.
I had no idea that I had so much to say about this! Let us all know how it goes.
Hey this is great information, thanks.
I was going to use a digging bar to pull up the old boards. Was also going to get the Cat's Paw and have a pry bar as well. I was told to cut the boards first, to make it easier to pull them up. Thoughts on that?
As far as not demoing all at once, that's a new and interesting thought. Seems it would be easier to just rip all the boards off, to be able to easily inspect what's underneath them. I wasn't planning on using a miter saw, since the length of the boards will be 14 ft, the same as what is currently down now. I was going to use a circular saw, if need be, to cut any ends off that I may need to. Am I wrong in this approach?
Thanks all!
It sounds like it might be possible to put down 16' lengths and use your circular saw to cut 2' off of all of them at once in one cut (you won't be able to buy 14' lengths as they only come in 12' and 16'). -Hard for me to tell without seeing if that can be done in your case (it could be really awkward and thus impossible).
If you're fussy, it can be difficult to get a truly square cut with a circular saw vs a miter saw on individual boards unless you are really use to it.
I don't see why it would be necessary to cut up the old boards to pull them up although it would be easier to dispose of them later if you cut them up when all done. However occasionally it can be useful to do a plunge cut with the circular saw from the top of the deck if you find that will be useful in some way. If you do any plunge cuts be careful and do it slowly so that saw doesn't buck up and jump.
For any demo I prefer to just use a flat bar with hammer to start at a vulnerable spot (such as an end while standing on the ground) and then work my way down each board with longer crowbars. You can also go at them from the sides using a longer crow bar or pry bar and sometimes use a piece of 4'x4' (or anything handy) to use as a pivot point for the bar (making it a lever) to give you leverage while pushing down. -Be careful, -sometimes they really pop-up or get away from you and slap back down.
You can also use two bars at once, -using one to get a bigger bite for the other and work your way down but that really only works if the boards are pretty shot. Otherwise you may have a bit of a fight on your hands pulling the old nails.
It's up to you and your circumstances if you want to demo all at once or not. -You could do an inspection from underneath and use a screwdriver to tap the joists near the top to see if they are soft or not.
General observation note: Sometimes folks are reluctant to spend money on good tools when they are only contemplating the next job. -Trust me, if you plan on real stewardship of a home you will congratulate yourself a thousand times for getting the good stuff which can also last decades. A worm-drive circular saw beats the hell out of a direct drive, a miter saw gives you a better result for many jobs for anything that needs to be accurate, a cordless impact driver and drill set has a thousand uses. Also, get a really good hammer like an Estwing brand, -not some light-weight thing etc etc. (just my 2 cents).
steel said:
It sounds like it might be possible to put down 16' lengths and use your circular saw to cut 2' off of all of them at once in one cut (you won't be able to buy 14' lengths as they only come in 12' and 16'). -Hard for me to tell without seeing if that can be done in your case (it could be really awkward and thus impossible).
If you're fussy, it can be difficult to get a truly square cut with a circular saw vs a miter saw on individual boards unless you are really use to it.
I don't see why it would be necessary to cut up the old boards to pull them up although it would be easier to dispose of them later if you cut them up when all done. However occasionally it can be useful to do a plunge cut with the circular saw from the top of the deck if you find that will be useful in some way. If you do any plunge cuts be careful and do it slowly so that saw doesn't buck up and jump.
For any demo I prefer to just use a flat bar with hammer to start at a vulnerable spot (such as an end while standing on the ground) and then work my way down each board with longer crowbars. You can also go at them from the sides using a longer crow bar or pry bar and sometimes use a piece of 4'x4' (or anything handy) to use as a pivot point for the bar (making it a lever) to give you leverage while pushing down. -Be careful, -sometimes they really pop-up or get away from you and slap back down.
You can also use two bars at once, -using one to get a bigger bite for the other and work your way down but that really only works if the boards are pretty shot. Otherwise you may have a bit of a fight on your hands pulling the old nails.
It's up to you and your circumstances if you want to demo all at once or not. -You could do an inspection from underneath and use a screwdriver to tap the joists near the top to see if they are soft or not.
General observation note: Sometimes folks are reluctant to spend money on good tools when they are only contemplating the next job. -Trust me, if you plan on real stewardship of a home you will congratulate yourself a thousand times for getting the good stuff which can also last decades. A worm-drive circular saw beats the hell out of a direct drive, a miter saw gives you a better result for many jobs for anything that needs to be accurate, a cordless impact driver and drill set has a thousand uses. Also, get a really good hammer like an Estwing brand, -not some light-weight thing etc etc. (just my 2 cents).
Thank you!
regarding the length of the boards, I was able to find 14' boards at Jaegar, which is what are on there now, so that's why I was just thinking of literally replacing what is currently on there. May have to cut just a little off some of the boards, but not much—that's why i was thinking of using a circular saw. Would a jig saw even possibly work for this??
thanks again
how high is the deck off the ground? if you demo the entire deck first you can look at the top of the joists and also put on some peel and stick waterproofing to protect the joists against deterioration.
I was going to ask about the height as well, but for a different reason. If it is a tall deck, I'd use the remove and replace method because it will hold all of the framing square for you, as opposed to being left with a wobbly frame. If you are two feet off of the ground, no big deal. Also, forget the jig saw for this. either leave the boards at 14' or plan to snap a line when you are done and cut everything straight.
FilmCarp said:
I was going to ask about the height as well, but for a different reason. If it is a tall deck, I'd use the remove and replace method because it will hold all of the framing square for you, as opposed to being left with a wobbly frame. If you are two feet off of the ground, no big deal. Also, forget the jig saw for this. either leave the boards at 14' or plan to snap a line when you are done and cut everything straight.
the deck isn't that high off the ground. at the highest point, which is the end away from the house, it's approx 4'. The area closest to the door is less than that. The deck does but up next to the garage wall on one side, and another part of the house on the other, so it's basically enclosed left and right as you're looking out from it. So, getting a saw to just cut off the excess of boards isn't the easiest of thing to do. That's why i was planning to measure what's there now and just replace.
Buy a roll of 6" Vycor which is a rubber flashing product and fold that over the top edge of your joists. You can cut it down to 3" which would be more than enough.This comes with a release sheet on the underside which is VERY sticky. This will preserve the top edge of your joists.
georgieboy said:
Buy a roll of 6" Vycor which is a rubber flashing product and fold that over the top edge of your joists. You can cut it down to 3" which would be more than enough.This comes with a release sheet on the underside which is VERY sticky. This will preserve the top edge of your joists.
that's great advice too. Thank you for that.

Help Wanted
Employment Wanted
Latest Jobs
Employment Wanted
-
FULL TIME/LONG TERM/NANNY/BABYSITTER/HOUSEKEEPER/MOTHER’S HELPER
Apr 30, 2024 at 11:47am
-
Our amazing driving nanny is available for work.
Apr 28, 2024 at 8:05am
-
(No Fees) Hire A Baby Nurse Here for Your New Borns! (732)-737-7165
Apr 27, 2024 at 1:46am
-
(NO FEES) Hire A Fresh Energetic Nanny/ Housekeeper Here ! (732)-737-7165
Apr 27, 2024 at 1:46am
-
(NO Fees) Hire Housekeepers Here! ( 732)-737-7165
Apr 27, 2024 at 1:46am
-
(No Fees) Hire Home Health Aides Here! (732)-737-7165
Apr 27, 2024 at 1:46am
-
Summer Private Speech Therapist
Apr 26, 2024 at 9:12pm
Help Wanted
-
KF503 FT Live In or Live Out Nanny for 1 Infant (May Start)
Apr 29, 2024 at 9:15pm
-
PF505 FT Companion for 16 Year Old Boy (ASAP Start)
Apr 29, 2024 at 12:05pm
-
Part Time help for special needs young adult
Apr 27, 2024 at 4:43pm
Lessons/Instruction

For Sale
-

REVO luggage $100
More info

Free Items

Advertisement


Hello.
I'm new to DIY, and am going to try to take on the project of laying down new decking...
My current decking is totally shot, meaning the boards are rotted and need to be replaced. The frame is fine though. I was planning on pulling up the old boards, and laying new ones down—seems pretty straightforward
Deck specs:
Approx 14' x 18', will use PT pine boards, that match the current ones.
First question is, nails VS screws, and then nail gun or collated screw gun? I know there are many opinions on this, so I'm curious to hear them all.
Thanks in advance